You might have heard the saying, "never send anything in an email that you wouldn't send on a postcard". It's true. Email might be secure in transit - between your computer and your mail server - but it's not guaranteed. And it's even less likely that email is secure at rest: on your computer, on the recipient's computer, or even on the mail server. A VPN can provide encryption between your computer and your mailserver, but doesn't do a thing for the content of the messages when they're on the server. The document that established a common internet email system was built on earlier work that just wasn't designed for a massive public internet. If we want to be able to send and receive email that we can trust, the two main flaws that we want to address are:
- Encryption: How can I be sure that the mail I send is only readable by my intended recipient(s)?
- Signing & Validation: How can I be sure that email I receive was actually written by the person who claims to have written it?
- It's free. It doesn't cost anything to install or use. There's no monthly fee, no service provider. You don't need any special hardware besides your computer.
- Once you catch on to how it works, it's pretty easy to use.
- You can use it alongside the rest of your email, in the same email account. You don't need a special address or anything.
There's one big caveat, though: you will need to install a local mail client (in this example, I'm using Mozilla Thunderbird). You can use it alongside your ordinary webmail from outlook.com or gmail.com, but you absolutely cannot send and receive encrypted messages, nor sign and verify signed messages, from the web client. If you could, you'd be handing the keys to the kingdom over to Microsoft or Google anyway. So let's not do that.
Installing and setting up Thunderbird for your mail provider is outside the scope of this tutorial. I chose it for the example because it's free, and GPG/OpenPGP functionality is built in. There's nothing else you need to download or configure, just Thunderbird. The brief summary is that you download it, install it (with the standard options - the "keep clicking next" approach), and when it starts up, it'll ask if you want to configure an existing email address. For many of the more common mail providers - gmail, Hotmail, outlook.com, verizon.net - you just tell it your email address and it'll get all the settings for you. If you're using a dedicated pseudo-anonymous address, like an 'aos.nickname@gmail' address or 'mynick@moronhorde.com', be sure not to give your real name here, just the nickname. Enter your password and you're ready to go. If you encounter any problems, you'll want to search for "configure thunderbird for verizon mail" (whatever your provider might be) to get that set up, or seek assistance from your local nerd. It might be a good idea to install Thunderbird on your preferred computer right now, and let it configure itself for your email address, just to get a feel for how it works. It should keep all the mail on the server (look for the term "IMAP" in the auto configuration screen to make sure), so you can always go back and use your webmail as usual, or switch back and forth between the web mail client and Thunderbird.
How it works
Full disclosure: this is the "hard part". It might take a while to get a handle on what's going on. Take your time. The way I'm explaining it might not be the best way for you to understand it, so feel free to ask questions in the threads or search around for other tutorials. Once the whole scheme "clicks", then you'll be able to understand it intuitively, but don't proceed until you "get it"; there's no point in generating a keypair or sending public keys around just following instructions by rote.
It might help to watch this video first, then read the steps below
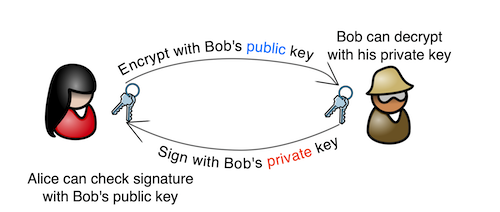
Public-key cryptography is based around the idea that with a pair of related keys (the private key and the public key), you can do some interesting one-way functions. With a public key, you can encrypt a message that can only be decrypted with the corresponding private key, and with a private key, you can sign a message that can be verified with the public key.
Between two parties (Alice and Bob):- Alice and Bob, on their own, generate their own keypair. Now Alice has her private and public key, and Bob has his private and public key.
- Alice and Bob exchange public keys. Now:
- Alice's keyring has her private key, her public key, and a copy of Bob's public key.
- Bob's keyring has his private key, his public key, and a copy of Alice's public key.
- Alice and Bob keep their private keys secret! They only exchange public keys.
- Alice wants to send a message to Bob, that only Bob can read. She types her message and encrypts it with Bob's public key, then sends the encrypted message to Bob.
- Bob receives the encrypted message from Alice. Since he has his private key, and the message was encrypted with his public key, he can decrypt and read it.
- Bob wants to reply to Alice's message. In this example, the reply doesn't need to be encryped - he doesn't care who reads it - but he wants Alice to know that he, Bob, was the one who sent the message, without any doubt.
- Bob types the reply and signs it with his private key, then sends it to Alice.
- Alice, and anyone else who gets the message, can use Bob's public key to prove that the message came from him. Only his private key could have signed the message, and anyone with his public key can validate that.
Now, they want to include Carol in the conversation. All they need is a copy of Carol's public key, and when Alice sends a message to Bob, instead of just using Bob's public key to encrypt it, she uses both Bob's and Carol's public key. The encrypted message can now be decrypted by either Bob or Carol with either of their private keys. Pretty handy! But what if Carol can get a copy of her public key to Bob, but not to Alice? That is, someone who claims to be Carol can get a copy of a public key to Alice, but Alice has no idea who it really is. Alice does trust Bob, though. Well, remember how Bob can sign a message with his private key - that only Bob has - and Alice can trust that the message really came from Bob? They can do the same thing with public keys. Bob can add a signature with his private key to Carol's public key before passing it on to Alice. Alice doesn't necessarily have to trust Carol, but she can look at Carol's public key and verify that Bob vouches for they key's authenticity by verifying his signature on Carol's public key, using her copy of Bob's public key. It might be easier to think of Carol's public key as an ordinary message: if Bob signs a message, you can be sure that it came from him. If Bob signs Carol's public key, he's vouching for its authenticity.
Practical use
If you don't 100% understand the relationship between public and private keys in a keypair, don't go any further. If you have any nagging "what-if" questions and scenarios, make sure they're resolved to your satisfaction before moving on.
Using local mail
Most people these days tend to use webmail. They'll go to the website for gmail or Hotmail or Outlook or Comcast or whatever, and use their web browser to send and receive email. This works fine, but it won't work very well with encryption. First, most webmail interfaces don't support it to begin with. Second, if they did, that would mean keeping a copy of your keyring - including your private key, the one you never want to distribute, on someone else's server. There are workarounds - you can encrypt a text file locally on your computer and copy/paste or attach it to a message, but it's a lot of hassle, and you have to do the same process in reverse when you receive a reply. The easier way is to install a local mail client, an application that runs on your computer and only communicates with your provider's mail server when sending or receiving mail (and checking for new mail). One that's easy to use, free, and works with many mail providers is Mozilla Thunderbird. You can even set it up to work concurrently with your webmail, so if you're visiting or not near your computer that has your GPG program and keyring handy, you can still use it for your regular mail. For that matter, you can use the webmail on your browser for day to day email and only launch the local client (Thunderbird) when you receive, or want to send, an encrypted or signed message. When an encrypted message comes in, it'll look like this:
-----BEGIN PGP MESSAGE-----
Version: GnuPG v1.4.15

wCWpSZeJlAKLDnyYhZ6KY+cIZ7E6RU5ZP3Hl/nu+ZQ14tcUYxUWwrg1t1m2fKaCk
wTzEOePoBZi56lIDe5r421ll0HaBL/6a5d2x4Xc08dOHswXKs+ZnUy9/C2n8MYiC
Installing and configuring GNU Privacy Guard (GPG)
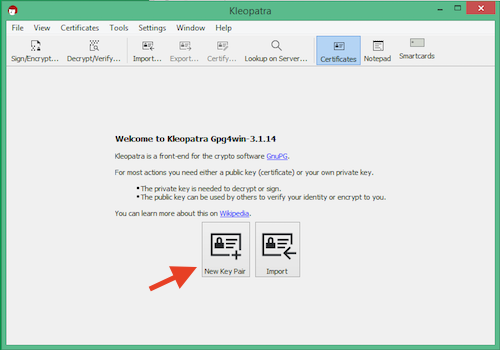
Exit out of Thunderbird if it's running, then go to the GPG4Win download page and download it (you can set the donation amount to $0 if you want to go straight to the download without donating). This is a package that includes the GPG frameworks and a few utilities. Just like you did with Thunderbird, go ahead and click through the standard options, then run Kleopatra (the main program for GPG4Win).
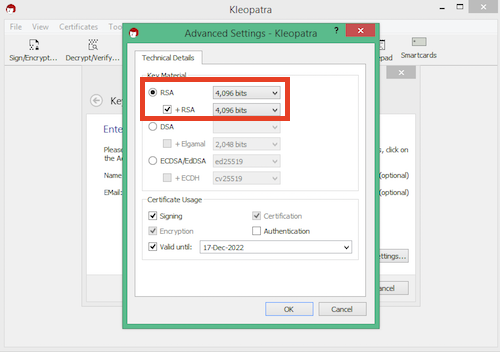
Before you enter anything in here, click the "Advanced Settings..." button and change the key size to 4,096 bits (keep it set to RSA).
Now enter your name and email address. The email address is the easy part; you'll enter whichever email address you intend to use for private communications and will be using in Thunderbird. If that's your "real" address, go ahead and enter it here, and if it's your anyonymous or alias account, use that instead. The "name" part will be bound to the key, so again, if you plan on sending messages that you want to be able to prove came from you by name, enter it here. Alternately, if you want to send messages that are, at least notionally, not bound to your real name, then enter your alias or HQ nick here instead. Click next, look it over to make sure that you've entered the name (or alias) and email address you want to use, then click "Create".
Now, you'll create a password to use for this keypair - not for your email address (actually, it's better if you don't use the same password that you use anywhere else), but the password that will be used to decrypt messages sent to you and sign messages to prove that they came from you. You really should take this password seriously and come up with a secure, long password, ideally more than 16 characters, including upper- and lower-case letters, numbers, and special characters. Think of favorite characters from childhood books, silly words your little sibling couldn't pronounce right, old advertising jingles, and so on. Things that are stuck in your long-term memory already. Make a little phrase out of the mash-up, something that you'll be able to remember. Try typing it several times quickly into notepad (don't save it, just type it), and if you make some typos, consider making those part of the password (now it's no longer a dictionary word, and maybe it's just easier for you to type that way). You can write the password down if you need to, but be sure to save the written copy somewhere that is safe, where you will be able to get it if you need it, and don't put any context clues like "GPG KEY PASSWORD" nearby. It is generally better to lose a password than it is to have one that is easily compromised. The combination of your private key and this password will decrypt any encrypted message sent to you, and sending you an encrypted message is an implicit trust that you will protect the correspondence and your private decryption key. Think about what might happen if someone else's private correspondence to you - or maybe several somebodys - is compromised by a lazy password that you set here. That's gonna be really a really, really, awkward moment in the camps.
Adding the key to Thunderbird
Now that you've created the keypair:
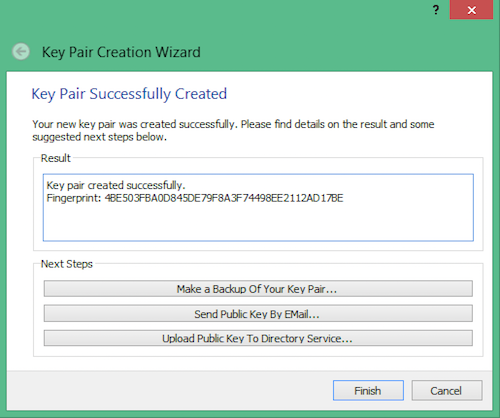
- Click the "Make backup..." button and back it up to a safe place. A USB flash drive is good; you can keep it separate from the computer in a safe or something like that. Go ahead and back up the keypair, and you'll have the first chance to enter your password to make sure you've entered it right.
- Now click "Finish", and keep the USB key plugged in for now.
- You can exit out of Kleopatra, and it's OK to quit entirely.
- Start Thunderbird
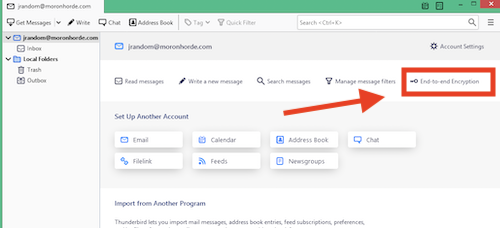
- Click your email account (the address, not any of the mailboxes)
- Click "End-to-end Encryption"
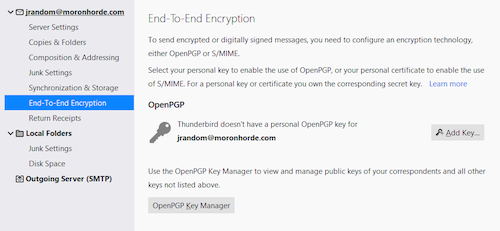
You've created a keypair, but Thunderbird doesn't know about it yet.
- Click "Add Key..."
- Click "Import an existing key"
- Navigate to the USB drive where you saved your backup (after you created the keypair in Kleopatra)
- Leave "Treat this as a personal key" checked. That's what you created it for, after all.
- Click "Continue"
- Enter the password for the key to import it.
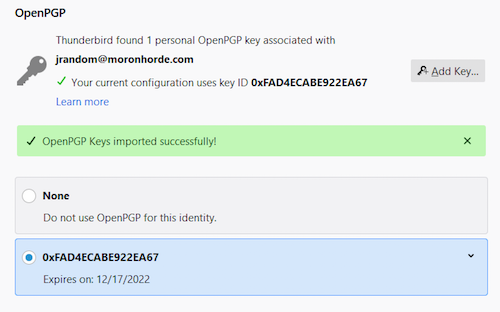
- Click the bullet next to the new key that just appeared to select the key for your address
- Close the "Account Settings" tab to return to your mail account (there's no "save" button, your changes are saved already)
Managing public keys
There are several ways to get a copy of your public key to someone, so they can encrypt messages to you and verify your signature on messages. The easiest way is to email it directly from Thunderbird:
- Click "Write" to compose a new message
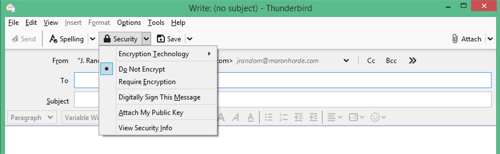
- Click the drop-down arrow next to "Security" to open the OpenPGP options menu.
- Choose "Attach My Public Key", type a quick message so the recipient knows the key is attached to the message.
- Click the drop-down arrow next to "Security" again and make sure that "Attach My Public Key" is checked
- Send the message.
Once they've replied back with their public key, you'll see the .asc attachment in the reply.
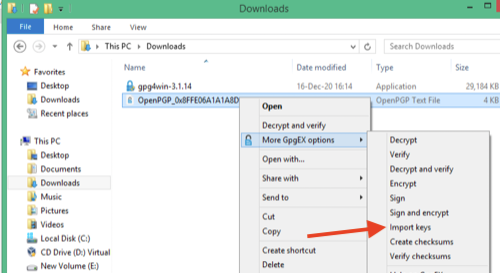
- Save it and run it through your preferred antivirus software
- Navigate to the folder that contains it in Windows
- Right click and choose "Import keys" from the "More GpgEx options" menu
Kleopatra will launch and examine the key. It's pretty smart! It knows this is just a key that could have come from anyone, and it's asking you to validate it before using it and trusting it. To do this, you'll use the fingerprint (you've probably seen the fingerprint listed for your key, but we haven't covered that yet). And since we aren't sure we trust the key, email isn't an option to validate it.
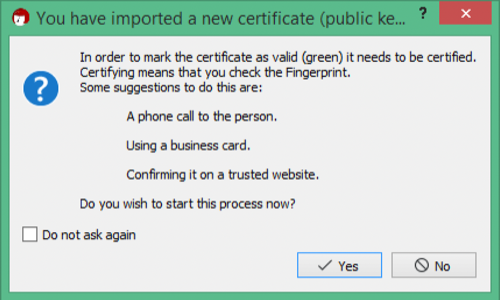
Instead, use a second channel to validate the fingerprint. This is way less complicated than it sounds. If you've got a phone number for this contact, you could just call and exchange fingerprints. In this example, I could call the person who'd sent me the key, who would look at their private key in their keychain and read off the fingerprint (this is what it looks like in OpenPGP for Mac):
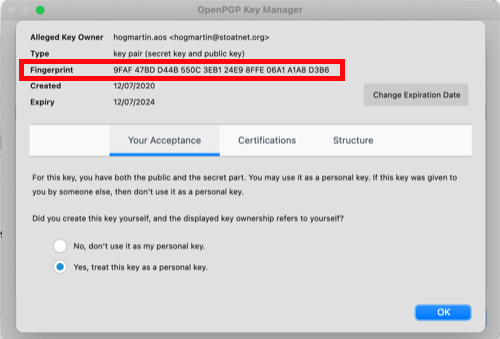
I'd click "Certify", compare the fingerprint for the key I'd imported with the fingerprint they read off, then click "Certify". Other ways to get a fingerprint check on the key might be at an in-person meet, in an email that's digitaly signed by someone else that I trust, or even a post on the forum - if you can be absolutely sure that the fingerprint is coming from a trusted source. Once you've clicked "Certify", you'll be asked for your private key password before you can import it into your keyring.
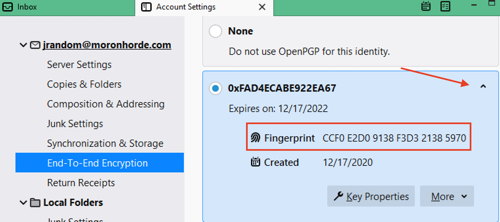
The polite thing to do is to verify the fingerprint on your public key, too. You can find this by right-clicking your keypair in Kleopatra and choosing "details", or by going to the End-to-end Encryption settings in Thunderbird and looking at the details for the key there.
Sending an encrypted message
Now we have your keyring with your public and private key, as well as a trusted public key from another person, just like in the example way up at the top. To encrypt a message,
- Click the "Write" button in Thunderbird, and address it to your new buddy.
- Click the "Security" button, and choose "View security info".
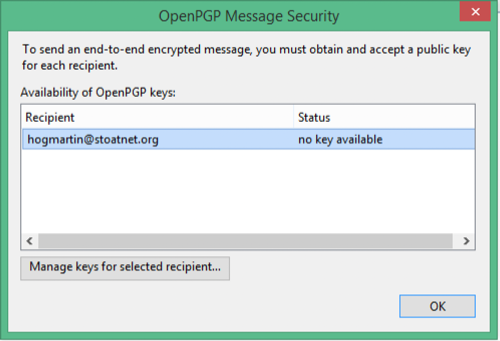
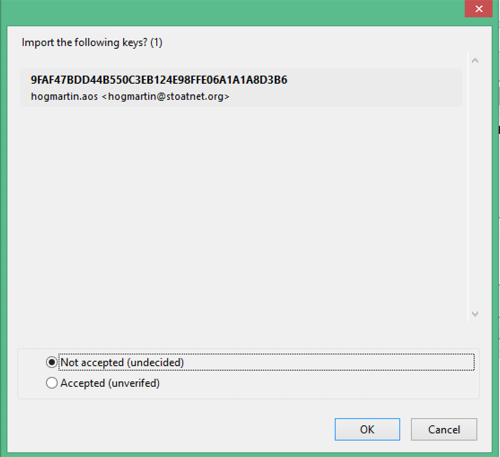
Click "Manage keys for selected recipient". Looks like there are no keys available, but we know Kleopatra has one. Click "Discover new or updated keys", and we can see it right there. You'll have another chance to inspect the fingerprint, just like in Kleopatra. If it's good, click "Accepted" and it will be imported.
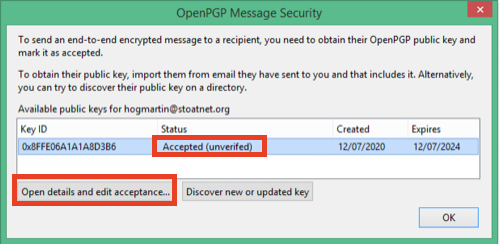
Note that it still shows up as unverified. That's good, you can still use it. There are a few layers of trust and validation built in, so it's difficult to accidentally accept an un-trusted key. If you are 100% certain that you trust this key, go ahead and click "Open details and edit acceptance" to mark it as 100% trusted. You don't need to do this; you can still use the key. You might want to reserve 100% absolute trust for only people you've met in person and swapped key fingerprints with face to face.

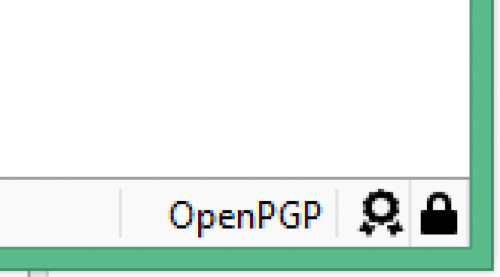
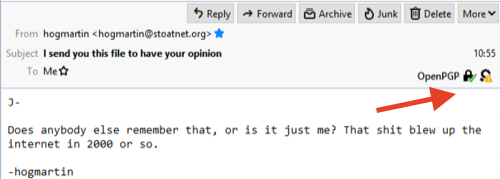
The good news is that you'll only have to go through this once for each email address and public key. In fact, after you click "OK" and return to your message, you can discard your current message and start composing a new one to the same recipient. As soon as you choose "Require Encryption" from the Security menu, Thunderbird will note that you have an accepted public key for this recipient and will both encrypt it to the recipient's public key and sign it with your private key. You can verify this by looking for the little OpenPGP icons that will appear in the lower-right corner of the message window.
On the other end, the recipient can verify that it's been decrypted. They can also view the raw source of the email and verify that it looks like whole long mess of this:
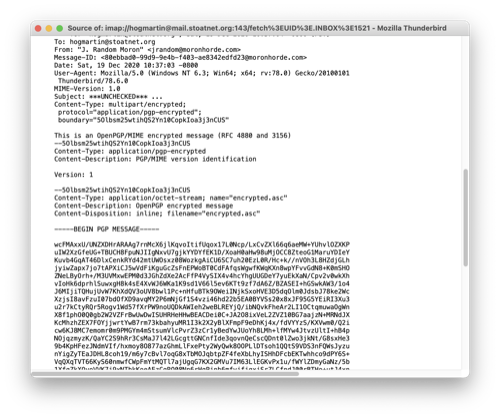
Verifying received messages
When they compose a message to you, they'll encrypt it with your public key and sign it with their private key; on your end, you'll decrypt it with your private key, and verify the signature with your copy of their public key.
Note that if you receive an encrypted message and view it in your webmail (gmail, Outlook, &c), you won't see the text. You'll see one or two attached files with .asc extensions. That's the encrypted text, and you'll need to read the message in Thunderbird to see it.
In this case, there's a good 'decryption' icon, but a little warning flag over the 'signature' icon. Click to see details.
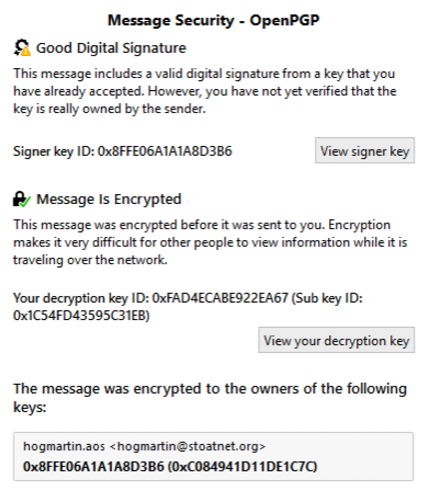
Oh. Well, that's not so bad. Actually, it's really good. The message was encrypted, and you had to decrypt it. The warning on the signature just means that we haven't absolutely validated that key yet, but we have assigned it a mid-level trust. So the signature is fine, and it was signed by a known key, but we just haven't fully vetted the key. Since I've decided, just this once, to trust myself, I'll go ahead and click "View Signer Key"
And click to verify in person that I've validated this key.

Now the icons indicate the new trust level. Obviously don't do this unless you fully trust the key - if you leave it as trusted but unverified, then you'll just get the little warning icon as a reminder. That's good.